… I’ll post our advent calendar as I promised to!
I have always loved advent calendars. They’re very common in Germany and pretty much every child gets to open one from December 1st through 24th. They used to be made from paper and behind each little door was a different pictures. My mother told me that she and her two brothers shared one calendar and it was the same each year! They didn’t seem to mind, though…
Today, advent calendars come in all varieties – filled with little or rather large pieces of chocolate, pralinés, or even toys – and most families will have at least one for each child. Many people craft advent calendars, too, for their children, their significant other, their parents, siblings, friends… advent calendars in abundance! I admit to being one of the crafters and thus our children would get a calendar each year, filled with little presents such as candy, small toys or wooden ornaments for the christmas tree. As nice as that sounds – and actually is! – it has three flaws:
- chocolate and candy are already omnipresent in December
- what’s inside each day gets more important than waiting for Christmas
- considering the chocolate overload one is likely to spend quite a lot on these „little presents“
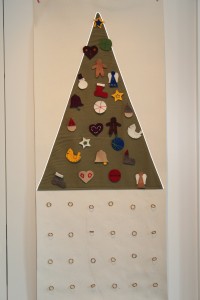
The solution to the puzzle came when I stumbled about this lovely advent sew-along over at homemade by jill. Isn’t it great? It uses little felt ornaments that the children can hang to a fabric tree each day and you can just store it away after the holidays and hang it back up the next year. Deciding to make one was a no-brainer, actually getting started (and finished) before December 1st quite a challenge.
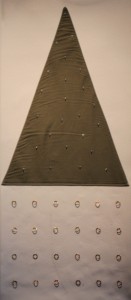
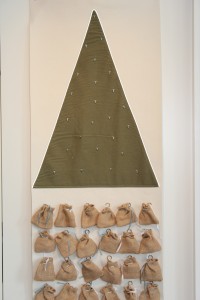
I started by buying the wool felt I mentioned in my last post. It looks and feels fabulous – it’s quite firm and brightly colored and well worth the expanse. I made a base out of white felt, added 24 rings to the bottom half (a button-fastening sewing machine comes in quite handy at this point!). From green fabric I had left over I cut a triangle to act as the tree, added 24 hooks (as in hooks and eyes) and some reflector piping along the sides for fun. I then sewed this to the upper half of my felt base and had this:

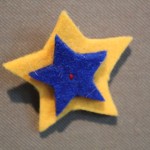
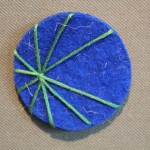
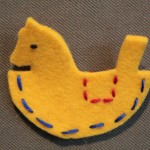
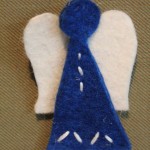
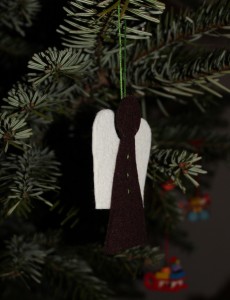
Then, of course, the ornaments had to be designed, cut, sewn/embroidered and eyes (as in hooks and eyes) fastened in the back. My husband did all of the designing – he searched for existing templates on the web, edited them to fit our needs and made some himself. A tiny selection:
Then I made little sachets from burlap, put an ornament into each of them, tied them with string and hung them to the rings. Now we had this:

The reflector piping makes for a nice snow-like flash effect, don’t you think? Other than in flash photography it only shows from certain angles, though.
And here’s how it changed between December 1st and 24th:

Thanks to Michael for taking all the pictures and animating them!
The children shared the calendar – taking turns in opening each sachet and hanging the ornament. They didn’t seem to mind at all that there were no „real“ presents involved and even suggested using the calendar again next this year.
Here it is again in all its glory:
Now go and make one – you have 139 days starting today!
Katrin